
- Quick Links
- Shop
- Brands
- About Us
Thanks for visiting Odd Bodkin!
Odd Bodkin Renaissance Shop is a sewing studio in the lush suburbs of Houston, Texas. Almost 2 decades of traveling to and working at Renaissance festivals, sewing garb, creating cosplay pieces, and helping couples create their perfect wedding attire has helped us develop a broad portfolio and set of design skills. We would love to help you with your next event or project!
Devlyn is a one woman show. She is available for consultations and fittings in person, email or phone.
- Info
- Connect
- Customer Service
Shipping
Turnaround time is about 8-10 weeks with the potential for delays during faire season. Regular non-garb orders are generally shipped within a week if we have it in stock.
If you need your order by a certain date, please call us and we will work with you to see if that is possible!
Please call or email us if you have a problem with an item. Most of our garments are custom made and are not refundable. Please take careful measurements and email if you are unsure.
If a custom item does not fit, or if you are not happy, please call or email to discuss an exchange.
If an exchange does not work out, your money will be refunded in the form of a gift certificate that can be used for any item on our site.
Please be assured that we want you to be happy and satisfied!Shop with Confidence

Odd Bodkin has been in business since July of 2002, but we have been making quality garments since 1997! We started out in a humble 300 square foot workshop in Miamisburg, Ohio, and have since relocated 3 times. Now that we are in Texas, our committment to satisfying customers and creating long lasting friendships with every client is a goal. We want you to be thrilled and tell all your friends about it!
 Become a Fan
 Follow Us
 Subscribe
 Pin with Us
 Recommend Us
 Our Blog
Infinite Gore SkirtInfinite Gore Skirt
I rarely make these skirts anymore since I find them rather bulky at the waist compared to our delicious Circle Skirts, but they do have their uses, especially for those who want more period looking skirts. If you want ME to make one for you, let me know. I'd be happy to. There are many patterns for this type of skirt out there, but even as a skilled seamstress I find the instructions confusing. This one is very easy. (I hope) For our purposes, this will be a 7 gore skirt. You can make it larger, or smaller depending on your waist and hip size and how full you want it to be. We are using a 3:1 ratio. Remember, you can use fewer gores if you wish as well as use the ratio to change the size of the gores. I like to use a 12":36" ratio (3:1) because it's easiest to remember but you could use any number you want. The first number will be the measurement at the waist, the second will be the measurement at the hem times however many gores you use. In this example since we will be using 7 gores the top will be 7 feet around and the bottom will be about 7 yards around before it is pleated into a waistband. Use 45" wide fabric. You can use lightweight cotton broadcloth, gauze, a poly cotton blend (my favorite for ease of care and less bulk), medium weight wovens, twills, brocades, satins, etc. Lay out the fabric without any folds in it. Use the following diagram to lay out your gores. 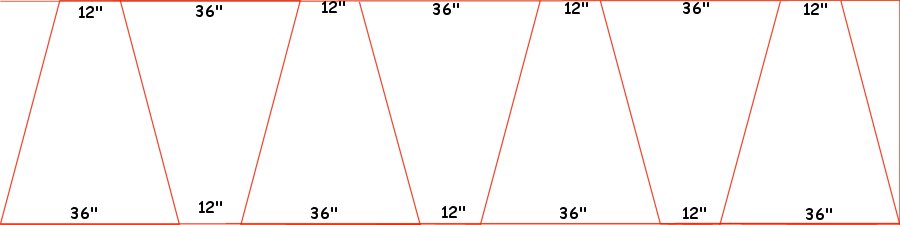 As you can see, this takes almost the whole length of fabric. You will have a 12" X 45" triangle on either end that you don't use for the skirt, you will use these pieces to make the waist band. Cut out the skirt. I use a 4' ruler to line them up. You can use a rotary cutter if you have one, or you can use scissors. This works best on a plain fabric with no pattern, or with a pattern that has no up/down direction (assymetrical). Next, take your gores and stack them on top of each other with the 36" at the bottom and the 12" at the top. Measure your waist to desired hem and add 2". Mark on the angled edge this measurement on either side, then draw a curve on the top going down 2" in the middle of each piece. Repeat this at the bottom hem and cut off the excess as shown in the diagram. 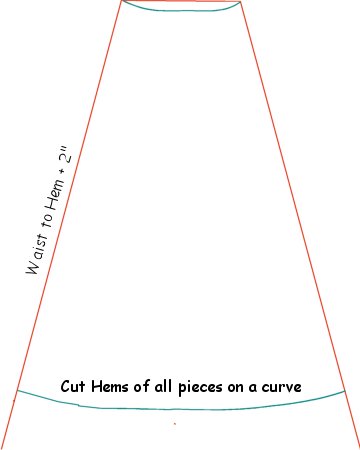 Sew all the angled edges together except for the last. Surge the raw seams or use a zig zag stitch to prevent ravelling. On the open edges, double roll and stitch to make a finished edge. This allows you to forego making an annoying facing. Stitch the edges together making sure the finished edge is on the inside of the seam. Leave a 6" gap at the top. Lay the finished edge flat and stitch. Now make the waist band. Take your waist measurement and add 1". Cut out two pieces that are this measurement by 4". This will give you a 2" wide waist band when it's finished. Interface both pieces with a medium-heavy weight iron on interfacing. Turn one edge up by 1/2" on each piece then put both pieces together with right sides facing each other and stitch along the remaing 3 sides. Clip the corners, turn and press. Pleat or gather the waist of the skirt into the waist band. Make them as even as possible all the way around. Stitch, then top stitch all the way around the waist band. Do another line of topstitching about a 1/2" in from the first stitch line. Use whatever closeure you'd like on the waist band. Buttons and loops, ribbon ties, grommets and ties, etc. Put on the skirt and have someone mark your hemline. Clip all the excess then surge (if possible) and double roll the hem as you stitch it. Please let me know if any of the directions are nonsensical. I wrote this off the top of my head so I might have forgotten something or worded something weird. I tried to find some pictures of one of my finished gored skirts and this is the only one I could find. I make this same skirt in wine twill and left one edge open, finished it with some trim and used it as a split skirt. :D    Good luck! Devlyn |
 Basket [more]Your basket is empty. Free Shipping for orders of $150.00 or more.Latest NewsSponsors |